Ready to bring your electronics projects to life? Learn the basics with our beginner’s guide, “How to Use a Soldering Iron: A Beginner’s Guide to Soldering Electronic Components,” and then
get the right tools for the job!
How to Use a Soldering Iron: A Beginner’s Guide to Soldering Electronic Components
Soldering is a fundamental skill for anyone interested in electronics, from hobbyists building custom circuits to professionals repairing complex devices. While it might seem daunting at first, mastering the basics of soldering is achievable with the right tools, techniques, and a healthy dose of patience. This guide will walk you through the essential steps, providing you with the knowledge and confidence to start soldering electronic components like a pro.
What is Soldering and Why is it Important?
Soldering is a process that joins two or more metal items together by melting and flowing a filler metal (solder) into the joint. The solder has a lower melting point than the metals being joined. Unlike welding, soldering doesn’t melt the base metals. Instead, it creates a strong electrical and mechanical connection by adhering to the surfaces.
Soldering is crucial in electronics for several reasons:
- Electrical Conductivity: It ensures a reliable electrical path between components. A poor solder joint can lead to intermittent connections or complete circuit failure.
- Mechanical Strength: It provides physical support, holding components securely in place on a circuit board.
- Corrosion Resistance: A good solder joint protects the connection from corrosion, extending the lifespan of the electronic device.
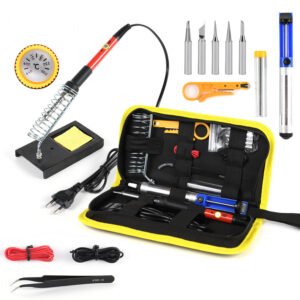
Before you begin, gather the necessary tools and materials:
- Soldering Iron: Choose a temperature-controlled Soldering Iron for consistent results. A wattage between 30W and 60W is generally suitable for most electronic components.
- Solder: Use rosin-core solder specifically designed for electronics. 60/40 (tin/lead) solder is a common choice, but lead-free options are also available.
- Soldering Iron Stand: A safe place to rest your hot Soldering Iron when not in use.
- Sponge: Keep a damp sponge handy to clean the Soldering Iron tip.
- Wire Strippers: For preparing wires for soldering.
- Helping Hands: These tools with alligator clips hold components in place while you solder.
- Safety Glasses: Protect your eyes from solder splatter and fumes.
- Ventilation: Work in a well-ventilated area to avoid inhaling solder fumes. A fume extractor is highly recommended.
Step-by-Step Soldering Guide
Follow these steps for successful soldering:
1. Prepare the Components
Clean the leads of the components and the pads on the circuit board. Oxidation can prevent the solder from adhering properly. Use a fine-grit sandpaper or a specialized cleaning tool to remove any tarnish or dirt.
2. Heat the Joint
Place the
Soldering Iron tip so that it simultaneously touches both the component lead and the pad on the circuit board. This ensures that both surfaces reach the soldering temperature.
3. Apply the Solder
Touch the solder to the heated joint,
not directly to the
Soldering Iron tip. The heat from the joint should melt the solder, allowing it to flow around the lead and onto the pad. Apply enough solder to create a smooth, shiny fillet.
4. Remove the Solder and Iron
Remove the solder first, then the
Soldering Iron. Keep the joint still while the solder cools and solidifies. This prevents a “cold solder joint,” which is weak and unreliable.
5. Inspect the Joint
A good solder joint should be shiny, smooth, and have a concave shape. A dull, grainy, or blob-shaped joint indicates a problem. If the joint looks bad, reheat it and try again, or remove the solder and start over.
Common Soldering Mistakes and How to Avoid Them
Even experienced solderers make mistakes. Here are some common pitfalls and how to avoid them:
- Cold Solder Joints: Caused by insufficient heat or movement during cooling. Ensure both surfaces are heated adequately and remain still until the solder solidifies.
- Too Much Solder: Can create bridges between adjacent pads, causing short circuits. Use only enough solder to create a solid connection.
- Insufficient Solder: Results in a weak and unreliable connection. Apply enough solder to form a smooth fillet.
- Overheating: Can damage components and the circuit board. Use a temperature-controlled Soldering Iron and avoid prolonged heating.
- Dirty Tip: A dirty Soldering Iron tip won’t transfer heat effectively. Clean the tip regularly with a damp sponge.
Case Study: Repairing a Broken Headphone Jack
Consider a common scenario: a broken headphone jack on a portable music player. Often, the solder joints connecting the jack to the circuit board have cracked due to stress. By carefully removing the old solder, cleaning the pads, and resoldering the jack, you can often repair the device and save the cost of a replacement. This simple repair demonstrates the practical application of soldering skills.
Statistics on Soldering in Electronics Manufacturing
According to a report by Grand View Research, the global electronics manufacturing services (EMS) market was valued at USD 508.71 billion in 2022 and is expected to grow at a CAGR of 7.5% from 2023 to 2030. Soldering is a critical process within EMS, ensuring the reliable assembly of electronic devices. The increasing demand for consumer electronics, automotive electronics, and industrial automation is driving the growth of the EMS market and, consequently, the demand for skilled soldering technicians.
Conclusion
Soldering is an essential skill for anyone working with electronics. By understanding the principles, using the right tools, and practicing diligently, you can master the art of soldering and create reliable, long-lasting electronic connections. Remember to prioritize safety, work in a well-ventilated area, and always wear safety glasses. With practice and patience, you’ll be soldering like a pro in no time!
“`